Quick answers
WILL THIS FIT MY EXACT BIKE?
Yes! The design preview is for illustration only. We will professionally adapt your chosen design to the exact make, model, and year of your bike before production.
CAN I SEE IT BEFORE YOU PRINT?
Yes! We’ll send you a digital proof for approval before printing, so you can request any final changes with confidence.
HOW LONG UNTIL IT ARRIVES?
Once paid, you should receive a design proof within 1-3 working days. Once the proof is approved your graphics should be on courier 2-3 days later.
Riders in action
Watch real riders with this kit on their bike.
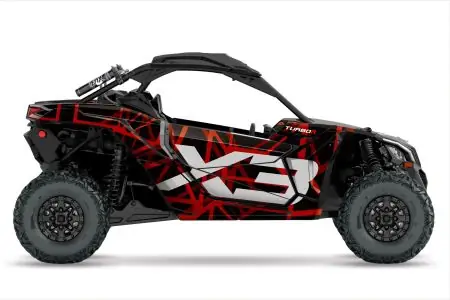
UTV SIDE BY SIDE CAN AM Maverick X3 and X3 max GRAPHICS LINE NATIONAL
The Can-Am Maverick X3 Line graphic kit embodies an elegant and posh style through its sleek design and vibrant colors. With clean lines and a sophisticated aesthetic, this kit elevates the UTV’s appearance, exuding a sense of refined style that stands out both on and off the trails. It’s a fusion of sophistication and vibrancy, creating an eye-catching look that speaks of premium quality.
Ultimately, the Can-Am Maverick X3 graphics are a testament to understated elegance and functionality, catering to enthusiasts who appreciate a clean, purposeful design that complements the vehicle’s performance-driven nature. It’s a statement of individuality and confidence for those who seek both style and substance in their off-road adventures.
UTV sticker kit prioritizes a balance between style and practicality, ensuring the graphics not only look striking but also provide a level of protection against scratches and wear.
Stickers are produced using only the best templates and print quality in market.
All Logos and Rider ID (number and name on the UTV) are changeable FOR FREE. Fits to all standart CAN AM Maverick X3
Can Am Maverick X3 graphics kit includes:
- Doors,
- Front hood,
- Front wings,
- Side wings,
- Arches (for X3 Max)
Installation instruction video: – here.
More designs made for CAN AM’s – here.
How to apply our sticker
Proper installation is the key to a perfect finish. Follow our simple guide to ensure maximum adhesion and long-lasting performance.
-
Step 1: Clean & Prepare
Thoroughly clean the plastics using brake cleaner, isopropyl alcohol, or glass cleaner. Make sure the surface is completely dry before applying the graphics.
-
Step 2: Apply the Graphics
Position the graphics and secure them with masking tape. Peel back one corner of the backing paper, stick the first corner in place, then slowly remove the rest of the backing while pressing the graphic down with a squeegee or credit card to eliminate air bubbles.
-
Step 3: Heat & Finish
Warm the graphics with a heat gun (95–120°C / 203–250°F) to activate the adhesive and ensure a strong bond. Clean any adhesive residue with brake cleaner, then let the bike sit for 24 hours before riding for the best results.
Riders in the wild
15,000+ riders 50+ countries. One kit.
We feature real rider photos every week.
Reviews

| 5 star | 0% | |
| 4 star | 0% | |
| 3 star | 0% | |
| 2 star | 0% | |
| 1 star | 0% |
Sorry, no reviews match your current selections